Skip to content
  • back
  • Glasshouse help

  • Glasshouse help
  • How Glasshouse is organised
    • Page types
    • Tabs
  • The basics
    • Creating pages
    • Adding and formatting content
    • Adding images
    • Managing files
    • Adding and managing users
    • Managing pages
  • Building learning sequences
    • Adding a sequence page
    • Adding a basic content block
    • Block types
      • Assignment block
      • Branching scenarios
      • Button
      • Cloze tests
      • Complex Feedback
      • Drag and Drop
      • xAPI forms
      • xAPI form display
      • Hotspot
      • Layout blocks
      • MCQ Buttons
      • MCQ - Drop down
      • MCQ - Range Slider
      • Short answer
      • Tables
      • Wiki
      • Sticky blocks
    • Front end editing
    • Adding media
    • Adding pop-ups
      • Adding blocks to pop-ups
    • Adding navigation
    • Completion Setting
  • Integration and export
    • Export SCORM
    • Adding a completion button
    • Setting up an LTI Integration
    • Single Sign On
    • Launch other sites
    • Export content in a simplified version
  • Other things you can do
    • Content curation with Glasshouse
    • Building spaced learning
    • Building interactive videos
    • Building an assessment
    • Building a handbook
    • Setting up a registrations page
      • Adding custom fields
    • Changing the visual design
      • Changing the login page
      • Changing site and page logos
      • Changing the navigation style
    • Building a dashboard
    • Certificates
    • Building workflows
    • Adding managers and buddies
    • Javascript actions
    • Shortcode
    • Using Glasshouse as a lite Learning Management System (LMS)
    • Restricted Navigation
    • Checklist
    • Group Rules
    • Text to Speech
    • Assignment Feature
    • Snippets

Adding and managing users

How to add and manage users

Users

Adding users

Start in the Security tab in the Navigation panel. By default the Users tab in the top Security panel will be selected. This tab will display a list of all current user accounts on your site.

  1. Click Add Member.
  2. In the Main tab enter Name, Email and Password and other details as required.
  3. Click Save or Save and close.

Editing user accounts

Start in the Security tab in the Navigation panel, in the Users tab.

  1. Click on the listing item of a user from the Users list.
  2. Edit details from any of the tab options in top panel.
  3. Click Save or Save and close.

Deleting users

Start in the Security tab in the Navigation panel, in the Users tab.

  1. Click on the Delete icon for the selected user (to the far right of the user listing).
  2. A dialogue box will appear with the text Are you sure you want to delete this record?
  3. Click Yes to delete the user account.

A user account can also be deleted from within the user details window, by clicking the Delete button on the right hand side at the bottom of the page.

User groups

Creating user groups

Start in the Security tab in the Navigation panel, in the Groups tab. This tab will display a list of all current groups on your site.

  1. Click Add Group.
  2. In the Members tab, enter a title into the Group Name field.
  3. Click on the Parent group dropdown menu (optional) to select a parent group for the new group. If this option is chosen, the new group will be a child of the selected group, and inherit it’s roles.
  4. Enter a description for the group into the Description field.
  5. Click on the Alternate homepage for this group dropdown menu and select an alternate page for this user group to view as a homepage (optional).
  6. Click on the Permissions tab to choose access permissions for the group.
  7. Click Save or Save and close.

Assigning users to groups

Start in the Security tab in the Navigation panel, in the Groups tab. Either create a new group, or click on a current group to edit the group details.

  1. Once a new group has been saved, a Member area will appear.
  2. Click the Add Member button to create a new member or add to the group, or
  3. Enter the name of a user into the Find members search bar on the right-hand side. Members matching the name entered will automatically appear in a dropdown menu. Select the member to add, and click Link existing.
  4. Click Save or Save and close.

Users can also be assigned to groups by clicking on the Main tab from within the user details window. Click on the Groups dropdown menu and select a group to assign the user to.

Removing members from groups

Start in the group details window, in the Members tab.

  1. In the Members area, click on the Unlink button to the far right of a user listing
  2. User will be removed from the group, but not deleted.
Options

User roles

User roles are another way to manage permissions and access of user groups. Rather than assigning permissions individually, roles can be created that have specific permissions attached to them. Permissions attached to created roles can be changed, and all groups assigned to that role will have those permissions updated automatically. Examples of roles include administrator, contributor, assessor, and viewer, among others. Create roles from the Roles tab in the Settings area. Once roles have been created, assign roles to groups from within the group details window.

Member status

Suspension

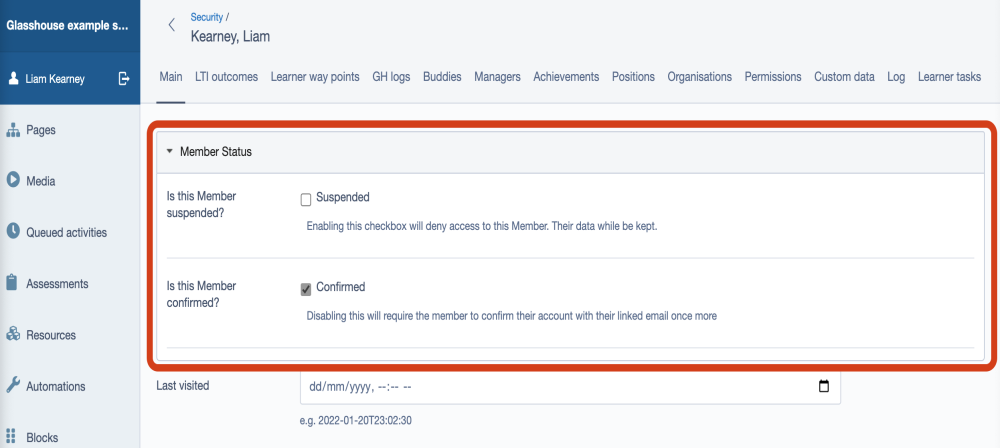
Glasshouse has an easy to use suspension mechanism. Suspending a user will allow all data to remain intact whilst denying login access to a user.

This can be really handy for temporary suspension of an employee who may return or even indefinite suspension for data preservation requirements. If you unsure if you should suspend or delete a User we would recommend going with suspension as it will remove the User's access allowing you to assess if the data is safe to be deleted.

Confirmation

Confirmation settings are exposed to the Member page so you can require a user reinstate their email confirm upon next access. This can be handy to periodically verify a User's access to their email.

To access the Member status toggles you can navigate to the security section from the main sidebar (Expanding if needed): From here expand the accordion and toggle the required statuses before saving your changes


Overview

Add and manage user accounts, grant access permissions and create and edit user groups. User controls allow flexibility in the way learners, managers and viewers interact with your site.